 |
Navigator Solutions |
Stock take
Stock take Introduction
You can ensure that Navigator's inventory levels remain consistent with your physical inventory by performing stock takes within your warehouse. Navigator supports two fundamentally different approaches to stocktaking:
- A traditional model in which the warehouse is closed, every item is audited and adjustments made;
- A cycle counting model in which individual location / product combinations are checked at regular intervals
You can use a combination of these two models in your warehouse to ensure inventory accuracy. Typically you will still need to perform an annual "complete" stock take to comply with audit requirements, however the need to perform this once per quarter can be removed if cycle count is performed.
Performing a Stock take
Each stock take performed is specific to a warehouse. This means that a single stock take job must be created for each “Site” within the system.
From any page in the WMS, select Warehouse Operations -> Manage Stock takes.
Generating a Stock take Job
To create a new stock take, press the “Create Stock take” button. Each stock take document relates to a single warehouse only. To complete an enterprise-wide stock take across multiple sites, create one new stock take document for each site.
Note: Navigator only allows a single stocktake to be active for each site. If you attempt to create a new stocktake against a site which has an active count, the system will give you the error 'There is already an open stocktake associated with this site. Please finalise or delete the existing stocktake - number: 1 before creating a new stocktake.'
Stocktake Header Information
| This is the unique identifier for every stocktake. |
| This identifies the stock take to mobile users. |
| This field is always set to SITE and is reserved for future use. This field cannot be changed. |
| To limit items counted to a specific storage client, tick this option and select the client relevant to the stock take. |
| Select the site at which counting will take place. |
| Optionally, the user can be directed to count a specific product class (e.g. Ride-on mowers v.s. Push Mowers) |
| Optionally, the user can be directed to count a specific product. This is useful when capturing serial numbers for a specific product. |
| If this option is ticked, the stocktake can be “finalised” by the user performing the count. Use this option only for very small stocktakes which involve a single user only (for example, when counting a delivery truck). If this option is not ticked, the user will receive an error message when they attempt to finalise the stocktake from their mobile device. |
Stocktake Operations
| This option will take an inventory snapshot against which count values can be compared to generate a variance report. |
This option will complete the stocktake and write-off any stock variances. This will overwrite inventory values relating to the stocktake parameters. Note that an initial stocktake must be completed and confirmed before the system is used for the first time.
There are three things you must decide when performing this process from the web screen.
- Comments. You may enter notes or comments against the stocktake.
- Clear uncounted bin locations. If this option is ticked, any bin locations you do not count will have their inventory reset to zero. If this option is not ticked, if a bin location is not counted, its' inventory value will remain unchanged after the stocktake is finalised.
- Set fixed picking location flag. If this option is ticked, Navigator assumes that if an item is counted in a 'picking' type location, this is the primary picking location for the product. The fixed flag prevents Navigator from returning the location to the list of 'empty' locations once all items have been removed from the bin.
|
When Should the Stock Take Snapshot Be Taken?
The decision on when to take a snapshot of the warehouse stock will depend on whether the warehouse will continue to operate normally (picking and receipting), or close, during the stocktake. If the warehouse is not closed, a specific process must be followed to ensure that the WMS system correctly calculates and processes variances.
If the warehouse closes during the stocktake:
- Make sure that all pending pickslips and receipts are processed BEFORE taking the snapshot.
- Take the snapshot at the time the stocktake starts.
- Once counts have been double-checked, select the Accept Stocktake option to write up/down bin level counts in the WMS.
|
If the warehouse does not close:
- Do not take the snapshot until immediately prior to finalizing the stocktake.
- Do not pick an item which has already been counted in the stocktake.
- If you receipt an item during the time of the stocktake, it must be scanned again through the stocktake module.
- Once the counts have been completed, select the Take Snapshot option.
- Do not process any further transactions until the stocktake has been accepted.
|
If the stocktake is allowed to be finalized remotely, the WMS will automatically take the snapshot at the time the stocktake is completed.
IMPORTANT NOTE: Once the stocktake has been confirmed, inventory adjustments will have been made. Do not use this option until the stockake results have been double-checked. Once the stocktake has been finalised, the stocktake results will appear in the next available export file.
Viewing Variances
Stock variances can be shown in multiple ways – by Product, Product Classification or by Location. To change views, select the menu option at the top of the stocktake screen.
You may export the results to Excel by clicking on the 'Download button on the web screen.
Running the Stocktake (273)
Generally, speaking, the stocktake should be performed by aisle. Each staff member should be assigned to an aisle and given coloured dots to apply to a location indicating that stock has been counted.
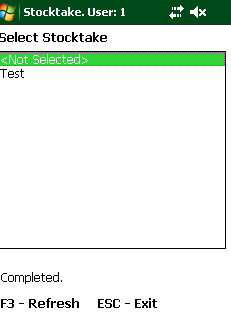 |
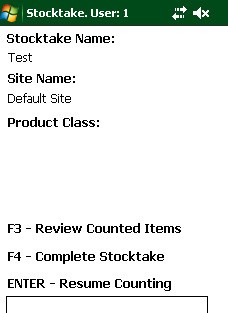
On the scanner, run transaction 273 - Stocktake. Navigator will load a list of active stocktake documents for the user's primary site and also for any 'child sites'. To refresh the list, press F3. |
 |
|
 |
Scan the location. Navigator will give you an error if the location is not valid.
|
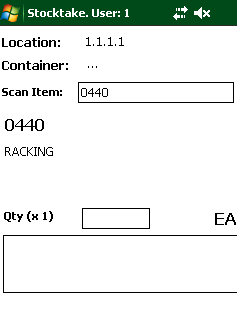 |
- Scan the first product you find in the location. Navigator will give you an error if the product is not valid.
- If the product is tracked by serial number:
-
- Navigator will display a box allowing you to type or scan all of the serial numbers you find. Navigator will give you an error if you attempt to scan the same serial number twice.
- The best method for scanning serial numbers using this model is to break the stock up into manageable batches - less than 100 serial numbers.
- If you make a mistake, or need to re-count, press the ESC button on the scanner. The scanner will clear all of the serial numbers you have scanned since the last successful update to the server.
- To complete a batch, press the F5 button. Navigator will submit all serial numbers to the server.
- If the product is not tracked by serial number, you should enter the quantity. Note that if the barcode you scanned related to a 'carton' of an item, Navigator will multiply your input by the carton size recorded against the barcode - so in this case only enter the number of cartons. If this occurs, the "Qty:" field will change to "Qty (x16)" (for example).
Once the product is counted, Navigator will ask for the next location. If there are still items to be counted in your current location, re-scan the location and continue as before to add the remainder of the items.
|
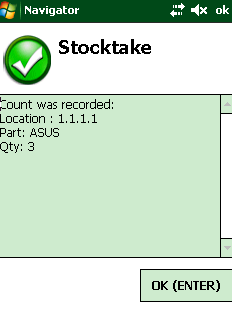 |
Once the stocktake item has been saved, the transaction is confirmed for the user. Press ENTER to move to the next item.
This alert may be removed if required by changing a system parameter. |
 |
Reviewing Counted Items
To review your count at any time, return to the stocktake 'Status' menu by pressing ESC (escape). Press the F3 button to display a search screen. By default, the system searches by location. Scan any location to review a list of items counted in the current stocktake matching the location or product scanned. You can press F3 to change between 'product' and 'location' type searches. Press ESC (escape) to return to the stocktake menu.
|
| |
|
Once the stocktake has been selected, all items counted will apply to this stocktake only until a new stocktake is selected. Each counted item is automatically tallied by Navigator - this means you do not have to manually edit quantities or manually tally the products. If an item is found in multiple locations - scan each location separately.
Once you have finished your section of the warehouse, simply exit to the main menu. Navigator's results are sent to the server as the count proceeds so there is no separate upload process required.
Additional Shortcuts:
- From the product prompt, press the F3 button to run the Product Barcode Allocate screen.
- From the product prompt, press the F4 button to run the Product Search screen.
Stocktaking Containers
If your warehouse uses containers to track bulk stock, Navigator allows you some flexibility in how pallet stock is included in the stocktake. Navigator's approach works as follows:
- Once the stocktake is scheduled, spend a week or so before the main day of the stocktake tidying the warehouse and ensuring that as much stock as possible is pre-counted. Do not take the snapshot until this pre-work has been done.
- Determine if you would like to re-count the stock on all containers, or would prefer to re-count only pallets over a certain age. If you want to force the warehouse to recount ALL pallets, set the STOCKTAKE_PALLET_AGE parameter to 1. This will cause the system to reject the addition of pallets created more than 1 day ago.
-
As there may have been pallets received in the four weeks or so leading up to the stocktake, you may determine that these pallets are likely to be correct to reduce the counting effort. In this case, set the STOCKTAKE_PALLET_AGE value to 30. Navigator will only reject pallets created over 30 days age. You may specify any valid number here.
-
Run the Stocktake (273) transaction.
-
Select your stocktake as discussed previously.
-
Press F4 to select 'Container Scanning'
Small Warehouses / Single Person Stocktake
If you are tasked with counting a small warehouse (e.g. a truck or an office), Navigator allows the stocktake to be finalised directly from the handheld terminal. Press the F4 button. At this time, Navigator will replace the inventory information it holds for the current site with the data collected during the stocktake. Note that this option must be specifically enabled by:
- Selecting the 'Allow Remote Finalise?' option on the stocktake detail screen.
- Granting the user access to the 'Finalise a stocktake' and 'Generate a stocktake snapshot' tasks.
Note that in this case, the stocktake snapshot is taken immediately prior to the stocktake completion process.
Configuration:
STOCKTAKE_SERIAL_IGNORE - Allows the stocktake to be conducted by quantities only without asking for a serial number.
STOCKTAKE_PALLET_AGE - The maximum age of a pallet (in days) which can be included in the stocktake.
Finalising the Stocktake
Once the stocktake has been concluded and there are no additional corrections to be made, you may finalise the stocktake. When the stocktake is finalised Navigator:
- replaces inventory records from the warehouse with the details collected during the stocktake. It also replaces the details of any container records within the site being counted ;
- removes previously inventory transactions for the warehouse ;
- marks all serial numbers not counted as "out of stock" and marks all serial numbers found as "in stock". Serial numbers are also created at this point.
- sends the 'STOCKTAKE COMPLETE' message to any integration software.