 |
Navigator Solutions |
Label Printing
Label Printing with Navigator WMS
Navigator is integrated with Bartender, allowing it to produce barcoded
labels as part of your standard warehouse workflows.
Navigator prints labels in a wide variety of scenarios,
including:
- During warehouse setup (location labels)
- During receipting (products and receipt labels)
- Picking (weight and despatch labels)
- Pallet labels
- RMA receipt (item and carton labels)
To get started with printing labels from your mobile
device you must have:
- your wireless network in place and have the base Navigator system
installed and tested;
- configured and tested the printer hardware
- configured Bartender commander
- configured the appropriate label formats in Navigator and added
the appropriate system parameters with the "LabelID" of
the format you wish to use.
- configured the printers to which label formats will be sent
Navigator WMS and Bartender includes three printer licenses
by default. To obtain additional printer licenses, contact your Navigator
integrator.
Compatible Printers
Navigator requires a TCP/IP enabled label printer, compatible with Bartender
Commander (see seagullscientific.com).
Compatible printers include (but are not limited to): -
- Intermec PF8
- Intermec PM4i
- Zebra S4M.
Note:
The printer must be connected directly to the network (i.e have an internal
or external print server attached).
The printer will require:
- A Fixed IP address (or a static DHCP allocation)
- Thermal ribbon (to print labels which you intend to
last more than a few months, including location labels)
The configuration of your printer will depend on the
manufacturer and model of the printer. You should therefore consult with
the manufacturer's installation instructions and with the company supplying
your printers to ensure the printers are configured correctly.
Navigator requires that you share the printer from the
server (this allows you to see if jobs are being created by checking the
Windows print queue).
1. Drivers
Download the Seagull Scientific Windows printer drivers
from www.seagullscientific.com
and install the correct version on your server.
2. Share the printer
on your server and note the share name given to the printer.
General Printer Notes:
Please consult your printer manual as a primary source of printer information.
PF8: Retrieve the IP address assigned
by pressing and holding the Feed button while turning the printer on.
The status LED blinks green for 2 seconds, blinks red for 2 seconds,
and then blinks green again. The printer
is accessible via the web interface on the IP address printed. The default
username / password for accessing the print server's web page is: admin/pass
Installing Bartender
Download and install the Bartender "Trial" from www.seagullscientific.com.
Your Navigator partner will provide you with the installation key within
30 days. Note that
Navigator requires the Automation Edition.
Download and install Seagull License Server. This will be used to store
your license key when it arrives.
Configuring Commander
There are two steps required to configure Bartender Commander:
- Configuring the Commander Service
- Adding Detection Jobs
Note: The folders used by Bartender Commander must be under 8 characters
in length and must not contain spaces or other special characters.
Navigator uses the following folder structure:
C:\Navigator\Commander
Underneath this folder, create one folder per label format as follows:
C:\Navigator\Commander\Products\DEFAULT
C:\Navigator\Commander\Receipt\DEFAULT
If you are running across multiple warehouses, you may add additional
folders using the external reference
from your Site as the folder name as follows:
C:\Navigator\Commander\Locations\BNE
C:\Navigator\Commander\Locations\MLB
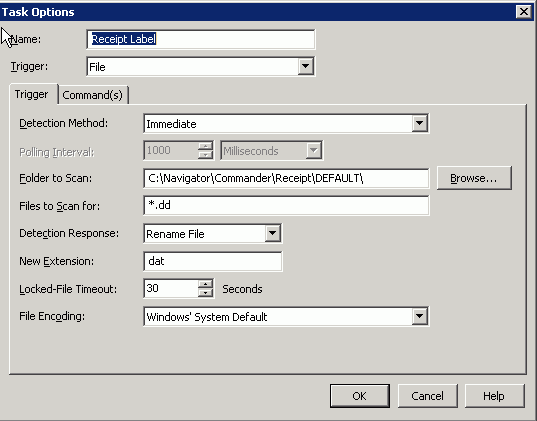
Configure a single Commander Task per folder:
- Ensure that the Command Type is set to Commander Script and the
Command is set to '%Trigger Contents%'.
- Ensure that the 'Folder to Scan' is set to the folder created above.
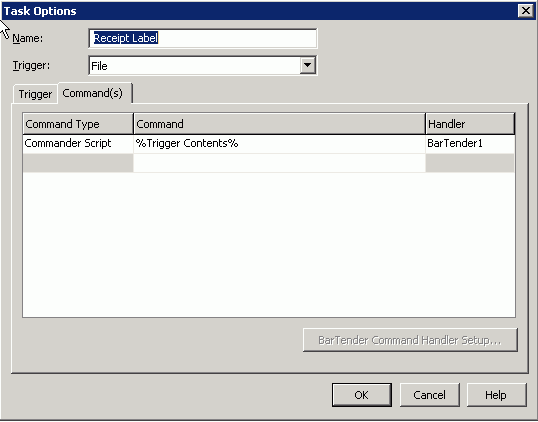
Save the label job, then stop/start Commander to ensure
the changes have taken effect.
Label and document printers used by the WMS need to be
added to the system via the System Administration -> System Setup
-> Manage Printers menu option.
- To locate existing printers, select the site at which the printer
is used and click 'Search'.
- To add a new printer, click the 'Add Printer' button.
- To edit an existing printer, click on the link under the Edit column.
This screen allows the administrator to change settings for the printer.
Fields on the Edit Printer Screen include:
ID: |
This is a unique identifier for the current printer. |
Site Name: |
Selects the site/warehouse at which the printer resides. Users
only see printers at their own site. |
Description: |
Displayed to mobile scanner users (e.g. Zebra - Front Counter
or PF8 - Production office) |
Printer Name: |
The “Share Name” of the printer based on Windows File + Print
Sharing. For example, if the path to the printer is: \\MYSERVER\MYPRINTER
the printer name is MYPRINTER. |
Printer Address: |
The name of the computer / print server to which the printer
is attached. This can also be the IP address of the print server.
Note: Do not
use 127.0.0.1 as the address even if the server running
the "Socket Server" is also the print server. Instead,
always use the server's name or IP address.
|
Default Printer: |
Determines if this printer be used as the default printer of
its type at the site. |
Printer Type: |
Options for this field include: DOCUMENT (for printing pick
slips or invoices) or LABEL (for printing picking labels / location
labels etc) |
Output Folder: |
This parameter is not used. |
Printer Language: |
For label printers, this field indicates what printer language
the WMS should use. For Zebra printers, select ZPL, for Datamax,
select DPL. For non-label printers, this field is ignored. |
Verbal Description: |
The description to be spoken to the user. |
Enabled/Active: |
Determines if the printer is current in use. If this box is
not selected, the printer is not displayed to users as an available
option. |
Print Test Page (Button) |
This will send a pre-formatted page to the printer to assist
identifying the printer. |
From any page in the Navigator system, select System
Admin -> System Setup -> Manage Label Formats.
To create a new label
format, press the New Label button.
To edit an existing
label format, click the Edit link next to the label.
This screen allows the administrator to change settings
for the printer. Fields on the Edit Label Screen include:
Label ID: |
This is a unique identifier for the current label format. |
Label Name: |
The name of the label as it is displayed to mobile and web
users of Navigator. |
Label Format File:
|
The Bartender file to be printed. Enter the full path to the
.btw file here.
Remember that
the path must be accessible using from the server using this path. |
Output Folder: |
The folder created and linked to Bartender Commander, WITHOUT
the site component. e.g. C:\Navigator\Cartons. Navigator will
drop commander files into subdirectories of this folder named
after the "external reference" of each site. |
Data Type: |
Used to filter label formats displayed to users based on
the type of data they are producing. |
Label Width: |
Parameter is not used. |
Label Height: |
Parameter is not used. |
Press the Save Label Header button to save your changes.
To change the format of the labels being printed (e.g.
layout), open the file format (extension .BTW) file in Bartender Professional.
A complete description of the use of Bartender is outside the scope of
this help file - a complete manual is available at the Seagull Scientific
website.
Note that once you have changed a label format, you will
need to stop/start Commander to have the new label format take effect.
Selecting a Printer for a Label
Once both printers and label formats have been added to Navigator, you
must decide which printers will be producing each label type. Navigator
allows the warehouse manager to define a mapping between label formats
and the printers on which they are produced. This is done at a site (warehouse)
level, and optionally on a per user basis. This method allows label formats
to be linked to the correct printer based on the printer's location and
the type of media (ribbon and label size) installed in the printer.
From any Navigator screen, select System Administration -> System
Setup -> Label to Printer Mapping.
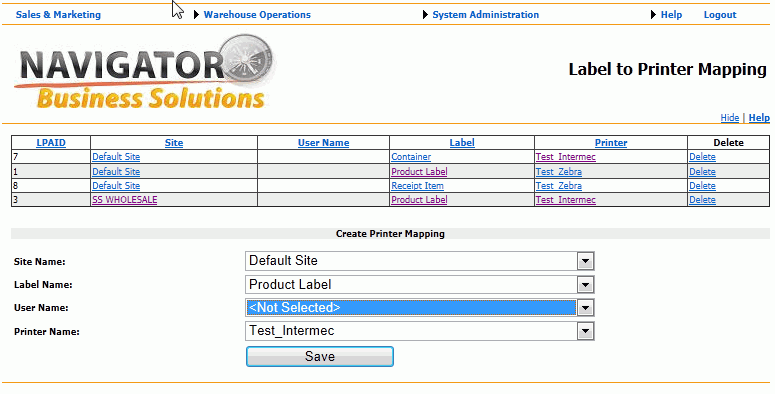
To create a new mapping, select
the Site to which it applies in order to filter the list of users and
printers. Select a label, optionally select a user, and a printer name.
Press Save to make these changes permanent.
To remove a printer mapping,
press the Delete link next to the mapping.
To use this screen, the user must have the
permission PRINTER_MODIFY.
By creating a site/label link, all labels of the type specified will
be printed to the printer selected. Navigator also allows the combination
of label format and user name to determine which printer to use. This
method allows a printer to be selected which is physically close to where
the user is working.
When a user on a mobile computer requests (either directly or indirectly)
that a label be printed, Navigator selects the first printer it finds
using the process below:
- Checks for a direct link between the user performing the print
and the label format being produced (select a User Name before pressing
Save)
- Checks for a link between the user's site and the label format
being produced.
- Checks the user's preferred label printer property (regardless
of label format). This may be selected using the 993 (Change Printer)
transaction.
If no printer is selected, Navigator returns an error message to the
user and no label is produced.
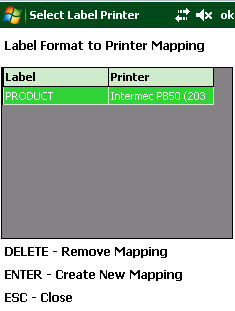
Selecting a Printer for a Label on the Scanner (993)
It is also possible to change the printer for a specific user and label
format via the mobile computer without returning to a PC. From the main
menu, run transaction 993. Use this function if the printer you would
normally use is not available (in for service, out of ribbon / labels,
or too far away).
 |
Review
Existing Mappings
Navigator displays any user-specific printer/location
mappings. From this screen you can clear the mapping by pressing
DELETE, or press ENTER to create a new mapping.
If you wish to change a mapping, please delete
the existing link and create a new link.
If the list is empty, this means that there are
no user-specific links between printers and labels. Each time
the user prints a label, the warehouse-level link will be used
to determine which printer should be used.
Note that to perform this task, you must have
been allocated the PRINTER_MODIFY permission.
|
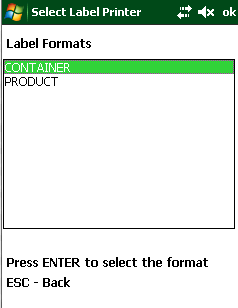 |
Selecting
a Label Format
Select the label format you wish to change
and press ENTER. |
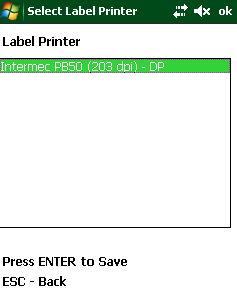 |
Printer
Selection
Select the printer and press ENTER to create the mapping between
the format and this printer. Only printers assigned to your current
site will be displayed here.
Your choice of printer will be based on the size of the labels
loaded into the printer and how far away the printer is from where
you are working. |
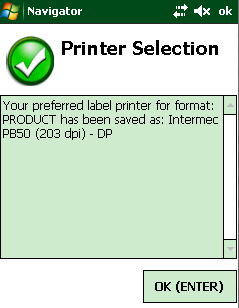 |
Confirmation
From this point forward, the printer/label format
link will be used and will override any printer set for the warehouse
until it is deleted. |
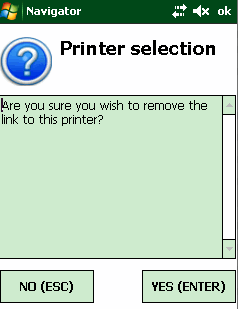 |
Remove
a Mapping
To remove a mapping, highlight the mapping from
the initial list of labels/printers and press Delete.
Removing the mapping only affects the user who
is logged into the scanner. After this occurs, when the specified
label is printed, the printer set at the site
level will be used.
Note: If there
is no site-specific printer/label mapping, an error message will
be generated when attempting to print this label format. |
Reprinting Labels
Navigator WMS records a history of all jobs sent to Commander for 7 days
(after which time they are automatically removed). If the label printer
does not print the label due to a misfeed, out of paper or other problem,
you can use the Navigator system to reprint the labels.
Open the System Administration -> Manage Label Jobs screen. Navigator
displays a list of jobs which have been processed in the last seven days.
The Job Name column shows a description of the item being printed (if
supplied), while the name of the user who requested the labels is shown
in the 'Printed By' column.
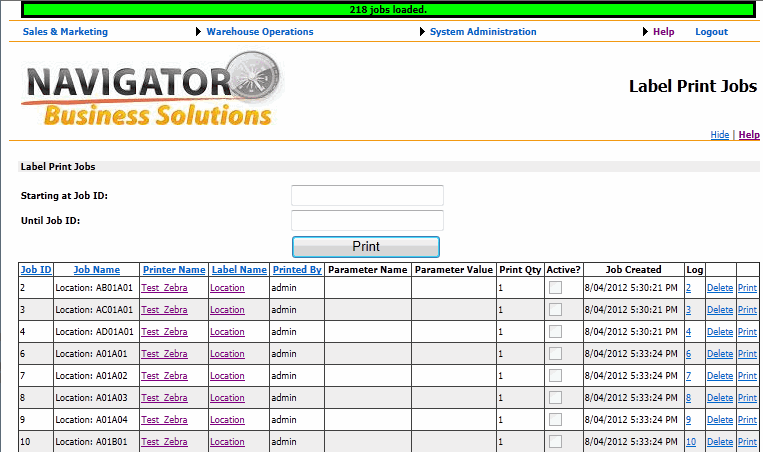
To reprint a specific job, press the 'Print' link.
To remove a specific job, press the 'Delete' link.
You may also release a series of jobs by entering the
start and end job number, then pressing the Print button.
If the job is not printing after having been sent several times, click
on the link in the 'Log' column to view messages which may indicate why
the job failed to print (e.g. the label format file was missing).
In order for the reprint function to work, the Navigator Socket server
must be running,
Relevant System Options:
LABELS_PRESERVE_JOBS_FOR - This parameter
(as a number) tells Navigator how many days label jobs should be saved
for. The default is seven days.
Troubleshooting Label Printing
As Navigator (using Bartender) is compatible with most barcode label
printers, it is impossible to provide information on all possible combinations.
If you have an issue printing from Navigator, your internal IT (or contractor)
should be able to perform steps 1 to 6. If any of these steps fail, you
should arrange to have your IT provider perform an initial investigation.
If your IT provider has tested all of the configuration items up to
step 7 (and corrected any issues) and you are still having issues, please
contact your Navigator integration partner.
- Confirm that the label printer is switched on, is connected to
the network and has labels/ribbons correctly installed.
- If the printer is skipping labels, feeding too many labels, or
displaying a "paper out" or "ribbon out" type
message (NOTE - every printer manufacturer will use different wording.),
this indicates an issue with the printing hardware. Please perform
a calibration on the printer.
If the calibration fails, please re-check that the labels/ribbons
are installed as per the manufacturer's instructions. Failing this,
please contact your printer supplier.
- Confirm that the printer does not have any error lights or messages.
As error messages and light colours/configurations may vary between
manufacturers, please consult your manufacturer's manual for details.
Check that the Bartender jobs are being displayed in the print
queue on the server. If these are being displayed, Navigator is performing
its job correctly - the issue lies on the network or printer.
Confirm that Bartender's Commander service is running. See the
Services page for instructions.
- Confirm that Bartender's Licensing service is running. See
the Services page for instructions.
- If printing via a print server or via IP address - confirm that
you can ping the IP address from the server. If this is not the case,
you should check the printer and/or network settings.
- Confirm that the "External Reference" of the Site has
not changed in Navigator. Changing this will cause the label files
to go to a new folder - you must tell Bartender Commander to look
in the correct folder.
- Check to see if the Bartender Commander file is being created successfully.
These are typically created in the C:\Navigator\??? folder - where
??? is the type of label format you are printing. Underneath this
folder, there is usually a folder for each Site. Commander files are
called <Random Number>.dd.
- Example: C:\Navigator\Commander\Locations\Sydney\a923941e2399123.dd
- As soon as Bartender Commander detects the presence of a .dd file,
it will cause Bartender to launch. The file will contain parameters
which tell Bartender how to look up the information required for the
label. These are typically used as parameters to an SQL Server Stored
Procedure.
The file is text only and can be reviewed in Notepad to ensure
the correct data is being sent to the printer.
- Once printing has completed, the file is deleted. If the files
are being created, and then deleted, please check that your printer
is online and Navigator is configured with the printer's correct IP
address and name.
- If the Commander files are not being deleted, sve the 'Log' file
from Commander and run the job command from a command line. Bartender
may display the issue it is unable to resolve. These issues are commonly:
- An problem with the License Server (for example, the License
Server has stopped - potentially due to a change in the hardware
on the server)
- A problem with the label format (for example, the label is
using 'True Type Fonts' and the Bartender file has not been set
to ignore these warnings)
- Bartender is licensed per printer. The default version installed
with Navigator allows Bartender to control up to three printers. To
control this process, the Seagull License Server is installed. If
this software is not running, you will be unable to print barcode
labels. The usual symptom seen is the message "Attempting to
contact License Server...." when you run Bartender manually and
attempt to print a label.
- Check the Seagull License Server under Windows Services - ensure
that the license server is 'Started'. See the Services
page for instructions.
- Confirm that you are not using more printers than the License server
allows. The default is 3 printers, although additional printers may
continue to work for a "grace period" of up to 28 days.
- A common cause of License Server errors is changing hardware in
your server (e.g. adding another hard drive or changing a processor).
In these cases, a new hardware-specific license key code must be obtained
from Seagull Scientific, or your Navigator integrator.
Running Commander Jobs Manually
It is useful to run Commander jobs manually to see if there is an error
in your label format file which is preventing printing from taking place.
- Stop Commander (this prevents Commander from removing the files
before you can view them).
- Print a label from your handheld or voice terminal.
- Navigator will create a file with a random name ending in .dd (this
is saved into a folder per label format, with a folder per site underneath
this).
- Open the log file in Notepad and copy out the command line Commander
is using to print the label. It might something like this:
C:\PROGRA~2\Seagull\BARTEN~1\BarTend.exe /AF="C:\Navigator\Label\Location.btw"
/PRN="\\192.168.0.11\PF8t" /P /X /C=1 /S=1 /?LID=1234
- Edit this text to remove the "/X" component (this prevents
Bartender from closing after it has printed)
- Copy the text into a "Command" (cmd.exe) window and run
the script manually.
- Take note of any errors or warnings which pop up in Bartender.
This may include, for example:
- The printer specified is not available (ensure you are not
using 127.0.0.1 as the server name when configuring printers in
Navigator).
- A message regarding printer font substitution might pop up
(asking if you wish to allow Bartender to substitute the printer
manufacturer's fonts in place of any "True Type" fonts
(Arial, Times Roman etc.). Printing will be fast enough on modern
hardware to always use the True Type fonts. Make sure you select
the 'don't ask me this question again' box, then save the label
format.
- Attempting to Contact License Server. This may mean your Seagull
License server is stopped or has expired.
- ... others (there are many other messages Bartender may display
- please consult the Bartender help file or visit http://www.seagullscientific.com/
)
- Fix any issues mentioned in the Bartender's label format, save
the format and re-try printing again.


