Navigator Solutions |
Field Name |
Description |
Type |
Either BIN or CONTAINER. Inventory stored on containers (CONTAINER) is shown alongside items stored loose in the location (BIN). |
Location Code |
Bin number |
Part Number |
The product code for the item. |
Part Description |
The item's description. |
QOH |
The current quantity on hand specific to this location. |
Minimum Qty |
Minimum quantity used for the generation of automatic replenishments. |
Last Count |
The date on which this product/location was cycle counted. The cycle count date is cleared the next time inventory is added or removed from the location. |
Fixed |
The ‘fixed’ flag prevents the WMS from removing the inventory record once it becomes empty. When performing a put-away transaction, a fixed location will be suggested first (before an empty location). |
Requires Replenishment? |
Indicates if Navigator believes the location is in need of replenishment. |
Replenishment Assigned |
The date/time a user was assigned to the replenishment task. |
Replenishment Priority |
The priority level for the replenishment (100 is the highest). |
To locate inventory items while in the warehouse, run transaction 231 (Locate Inventory). This screen allows the user to search for stock items either by location or by product. Using this screen, it is possible to answer the questions:
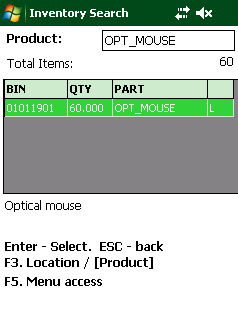 |
Product
Search
When in product mode, scan the barcode of the item, or type the part number. Navigator will give you an error if the product code is not valid. The scanner presents a list of items in the location along with the quantity of goods stored in the location. The description of each item is displayed underneath the grid as it is highlighted. To conduct a new search, simply scan the next barcode, or press ESCAPE to return to the product/location prompt and re-enter a new search term. To exit the screen, press ESCAPE from the product/location prompt or just press ENTER from the search results. |
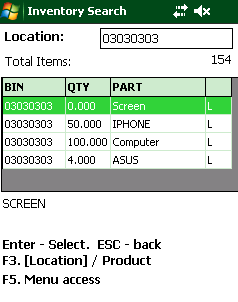 |
Location
Search
When in location mode, scan or type the location code. As before, the scanner displays a list of items in the location, and allows a new location to be selected by scanning it, or pressing ESCAPE then typing a new location. |
|
Clearing
a Pick Location
If a product has no stock on hand, it is possible to clear a picking location set using the "931 - Set picking location" transaction. Perform a search by location or product, then use the arrow keys to select the location/product combination to remove. Press the DELETE button and confirm by pressing ENTER. Note: In order for this transaction to succeed:
|
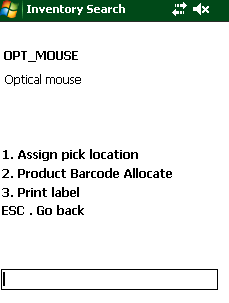 |
Additional Functions
Press F5 to access additional functions from this screen.
From this menu, it is possible to:
1. Assign pick location - this option runs the "931 - Assign Pick Location" screen, copying the selected part number into the relevant field.
2. Product Barcode Allocate - this option runs the "PBA - Product Barcode Allocate" screen, allowing barcodes to be assigned to stock items.
3. Print label - this option requests the production of a single label. |
Navigator allows three methods of adjusting the quantity on hand for a particular item. In all but the last case, the preceding inventory rules and additional processes apply.
For the first two methods, Navigator enforces that stock must be sent both 'from' and 'to' a location. In order to perform an inventory 'write down' or 'write up', you must select a location which has the 'Adjustment Location' flag set. Adjustment flagged locations NEVER hold inventory - Navigator ignores all requests to add or remove inventory from these locations, resulting in a net increase or decrease in your stock levels. To ensure that these locations are not used to artificially inflate inventory figures, Navigator's security module allows the location to be marked as a 'Quarantine' location. This setting prevents stock from being removed from a location without the 'QUAR_REM' permission.
Another approach to adjusting inventory involves using the 'Inventory Adjustment' document and moving the stock to a different Navigator site. In this scenario, the destination site holds the adjusted quantity as a positive figure. Since the stock has 'moved' between warehouses, Navigator can then upload the inventory movement to your accounting system, providing full visibility to your accounting staff of inventory alterations.
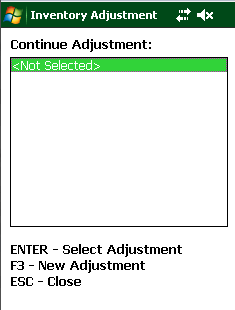 |
To access the Inventory Adjustment process, run transaction 214 on the scanner. When you load the form, Navigator shows a list of all incomplete adjustments. If you have started an adjustment and have not yet 'finalised' the document, it will be listed here. To continue working on an adjustment, select the document and press ENTER.
To create a new inventory adjustment, press F3. |
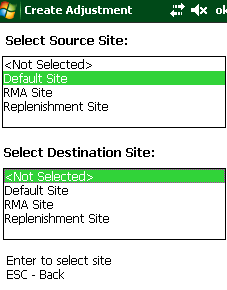 |
When creating an inventory adjustment, Navigator asks the user to confirm a "source" and "destination" site. If you are writing stock off, you would select your warehouse (in the example, this is the Default Site). Stock will be removed from this warehouse. Press ENTER to select the warehouse.
Select the destination warehouse for the stock. The warehouse selected will be determined by your accounting system. Typically, an accounting system will hold separate inventory balances for each warehouse. The adjustment process used by Navigator assumes that a separate inventory location will be set aside solely for the purpose of recording inventory losses/gains.
When this document is completed, Navigator will have moved stock from one warehouse to another (internally) and will alert the accounting system that stock should be moved.
Note that you can transfer stock from an adjustment warehouse into the main warehouse in the same way (to cope with stock which has been 'found'). |
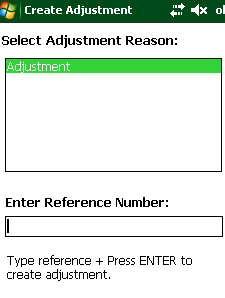 |
Navigator prompts you to enter a reason code. The list is customisable,
and may be changed through Navigator's web interface. To edit
the list, go to System Administration -> System Setup ->
Pick Reasons.
Navigator forces the user to enter a reason for the adjustment. Typical reason codes are:
Press ENTER once you have selected the reason.
Enter a reference number for the transaction. This is displayed on the pick overview screen, and can be used to search for inventory transactions in the future. |
 |
Once the adjustment transaction is created, Navigator displays
the pick menu. The same menu is displayed if you open an exist
(parked) adjustment. To add items to the adjustment, press ENTER.
You may also review items previously scanned against the adjustment by pressing F3. To complete the inventory adjustment and post the information to your accounting system, press F5. Note: If you select the same warehouse as both the source and destination for the stock, Navigator will not alert the accounting system, since the net result would be no change to the inventory balance. Navigator will, however, perform an internal inventory transaction. |
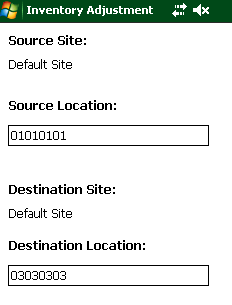 |
Scan or type the location from which stock is to be taken.
Navigator will give an error if the location entered is not valid
for the 'Source' warehouse/site.
Scan or type the location into which stock is being transferred. Navigator will give an error if the location entered is not valid for the 'Destination' warehouse/site. Performing a stock 'Write Up' To increase the balance in Navigator, the location entered in the 'Source Location' field should be designated as an 'Adjustment' type location. This ensures that you do not end up with a negative inventory balance in this bin. Performing a stock 'Write Down' To increase the balance in Navigator, the location entered in the 'Destination Location' field should be designated as an 'Adjustment' type location. This ensures that you do not end up with a negative inventory balance in this bin. |
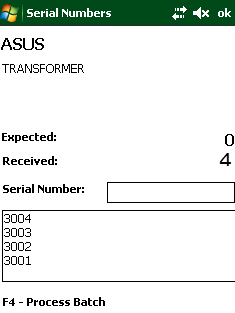 |
If the stock item being transferred is designated as being tracked by serial number, Navigator will prompt for you to scan the serial numbers of the items to write up/down in place of requesting a quantity.
Scan each serial number, and press F4 when you are ready to process the batch of numbers. To cancel entry of serial numbers (e.g. to change to a different stock code), press ESC.
Note: Navigator will give an error message if you scan the same serial number more than once onto the adjustment document. Navigator will also check to ensure the serial number is present in the bin location from which stock is taken.
|
 |
From the pick menu, you may review a list of items picked by pressing F3. To return to the main menu, press ESC. |
Inventory Transfer
From the main menu, run transaction 243 to access the transfer function. To move stock between bins:
Navigator will update inventory in both locations. For details on this process please see 'Inventory Movements' below.
Adjusting Inventory
This screen may be used to perform an ad-hoc inventory adjustment. To do this, either the 'source' or 'destination' location must be designated as an adjustment type location. The inventory balance in an adjustment location is always zero, and the usual rules for updating inventory (e.g. no negative stock) do not apply.
|
The location is flagged for replenishment if the quantity on hand is outside the minimum/maximum range or the demand for stock from a location (calculated as the sum of quantity remaining to be picked) is greater than the quantity in the location.
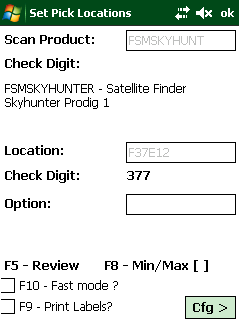 |
Assigning
Pick Locations
To set the primary picking location for a stock item within a warehouse, use scanner transaction 931 (Set Picking Location). This screen performs the following steps:
Depending on configuration, Navigator may also perform the following steps:
To enable this functionality, set the system parameter 'INV_ALLOW_MIXED_LOCATIONS' to '0'.
Tip: From the product prompt, press F5 to review a list of products which appear on pick slips, but do not have a location code assigned to them. Press ENTER on the product to select it, or ESCAPE to return to the product prompt.
Minimum / Maximum
After the quantity is entered, Navigator can also request the minimum and maximum quantity for this picking location. To toggle this request, press F8.
Additional Shortcuts: - From the product prompt, press F3 to assign a barcode to the product. - From the location prompt, press F3 to run the "Create Location" screen. - From any prompt, press F8 to turn on/off the prompt for minimum/maximum quantities. - From any prompt, press F9 to turn on/off the label printing function. |
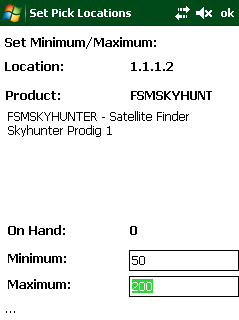 |
Minimum
and Maximums
In order to assist in replenishment operations, you should set a minimum and (optionally) a maximum quantity per item per location. Navigator includes a screen to manually change these figures during the warehouse setup phase. In the 931 transaction, press F8 to toggle the Min/Max request. Once you have confirmed the location/product mapping, Navigator will look up and display the current minimum and maximum values for this picking location. You may accept these figures by pressing ENTER, or type over the values to set new values. Scheduler Navigator's scheduler can automatically set the minimum quantity for the location based on historical daily picking volume. If you wish to manually set minimums, you will need to turn off the automatic calculations by setting the system parameter 'REPLEN_AUTO_MIN' TO '0'. |
|
Labelling Bin Locations Navigator allows labels to be produced which contain both the location code and the stock code and description (along with other relevant information). These are printed as soon as the transaction to link product to location is complete. Note: This option should NOT be used if the warehouse has a high turnover of stock lines or if picking locations change frequently. Press the F9 button to turn labelling on and off.
You may also set the initial value of this check box with the system parameter: PRINT_LCID_LABEL. Set this to '1' to enable label printing by default.
To adjust the label format you are using or to change to a different printer, press the 'Cfg >' button at the bottom of the screen. Select the label format you want to use. Navigator will automatically determine which printer is assigned to this format.
Note:
Press the '<Back' button to resume the labelling process. |
|
|
