Navigator Solutions |
Incoming Goods Requests (IGRs) might be pre-imported into Navigator via a batch process (e.g. if your accounting system is not SQL Server based), or may be created dynamically when your goods arrive at the dock, and Navigator performs a real-time lookup into your accounting system.
Once the goods have arrived at the warehouse, Navigator allows the creation of one or more receipt transactions.
IGR documents can be found by going to the Warehouse Operations -> Incoming Goods Requests. You may search by supplier and/or purchase order to locate a specific document.
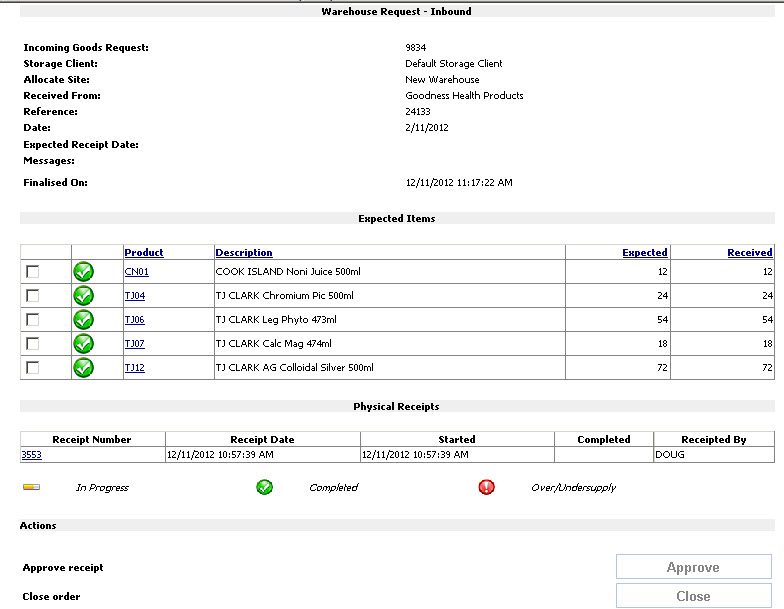
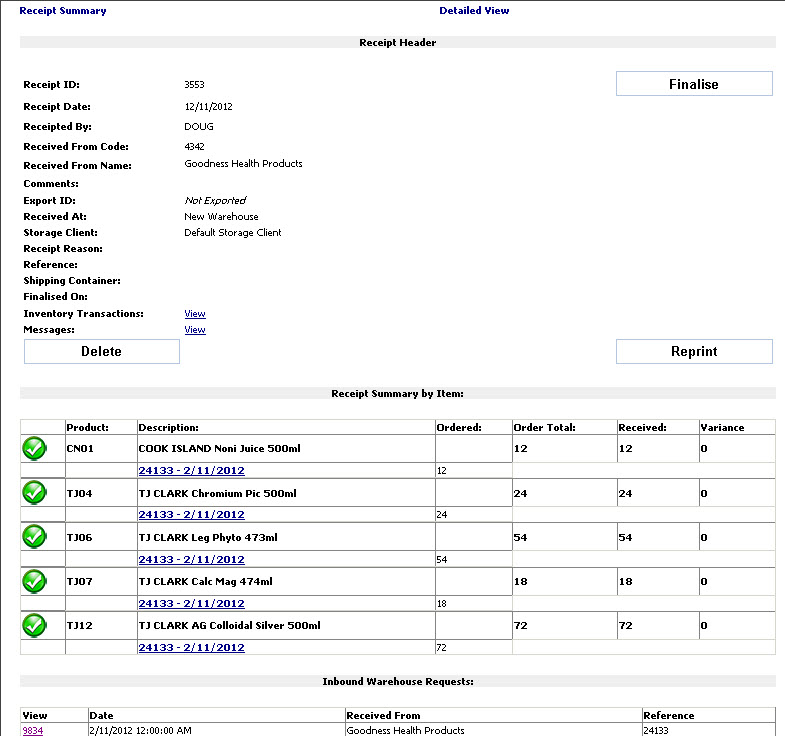
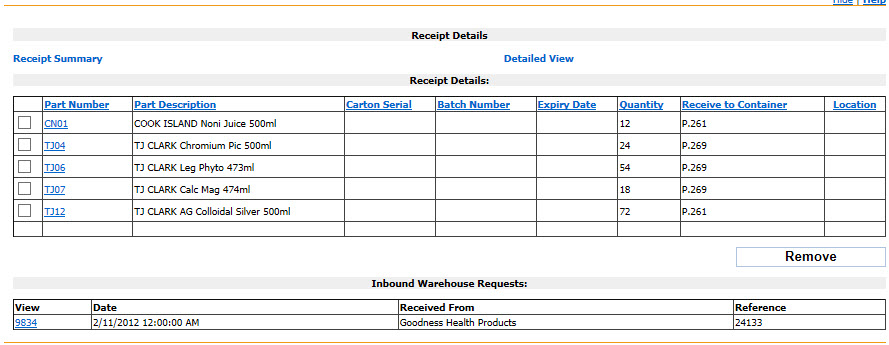
When you have located the request, you can open the request to review details about items expected. Navigator shows the quantity expected along with the received quantity. This screen shows a summary across multiple receipts. If your purchase order arrived over two days across three shipping containers, the data displayed on this screen relates to the purchase order as a whole. To review detailed information about the items received (e.g. batch numbers, expiry dates, serial numbers, pallet numbers or receiving locations), click on the link next to the receipt document at the bottom of the page.
This page also allows a supervisor to approve a batch of received stock before it is uploaded to the accounting system. To release the receipt, press the 'Approve' button at the bottom of the screen. Note that you must have the appropriate permissions to be allowed to perform this function.
Navigator allows you to close the receipt to prevent it from being displayed on the scanner screen (e.g. if the supplier partially fills the purchase order but does not backorder the remainder). To do this, click the 'Close' button at the bottom of the screen.
In a planned model, Navigator is integrated to your accounting system to assist in verifying that goods received match those ordered. Unlike picking, Navigator does not (by default) download a list of purchase orders in advance. Instead, Navigator allows the warehouse staff to search for active purchase orders in your accounting system as the goods arrive at the receiving dock.
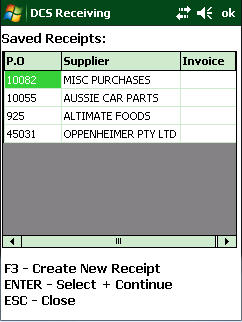 |
Creating a New ReceiptRun the receiving program from the main menu (2201 - DCS Receiving)Press F3 to create a new receipt. |
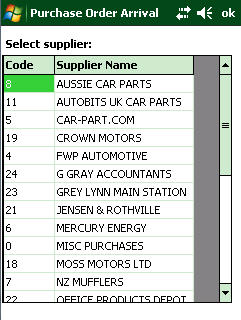 |
Select the SupplierFilter the list of suppliers by typing part of the supplier's name or code. Press ENTER to select the supplier. |
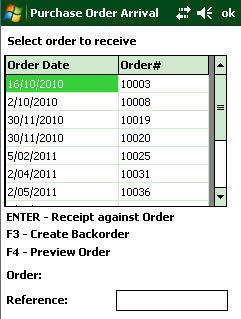 |
Select the Purchase OrderFilter the list of available orders by typing part of the order number. To review the order press F4. This action will show the first ten items from the order.To create the receipt and link it to the purchase order, press F4 and enter a reference number (e.g. supplier's invoice number). To create a receipt without a linked purchase order, press F3 to create a backorder and enter a reference number. Using this model, Navigator will not be able to check that items received are correct / valid for a particular purchase order. Once the receipt is created, you may commence the scanning process (see below). |
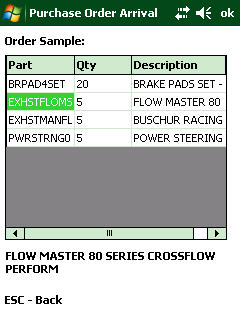 |
Review Items on the OrderTo finish reviewing the purchase order sample, press ESCAPE. |
|
Incomplete Receipts
|
 |
Receipt Menu
Once a receipt is loaded into the scanner, Navigator displays the receipting menu. From this menu you may:
|
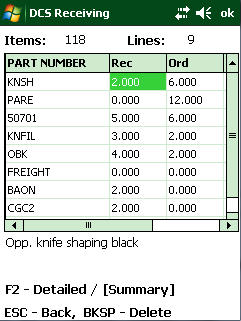 |
Reviewing Receipt LinesFrom the Receipt Menu, press F4 to review a list of items on the current receipt. You may search through this list by typing part of the part number or description. Navigator will filter the list as you type. As you scroll through the list of items, the description of the stock item is displayed at the bottom of the screen. To clear your search, press ESC (escape). |
|
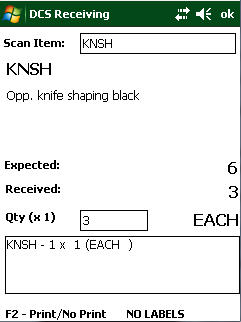
Receipting Items
If Navigator is not configured to request a destination location, the receipt line will be saved and is immediately visible via the discrepancy report under Inbound Warehouse Requests from the Warehouse Operations menu.
Additional Shortcuts - Press F3 from the product prompt to assign a barcode using the Product Barcode Allocate screen. - Press F4 from the product prompt to search for products by description or part number. |
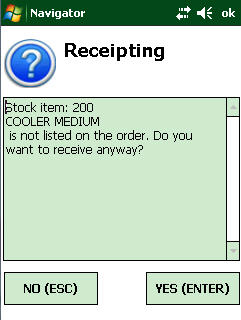 |
Unexpected Items
|
|
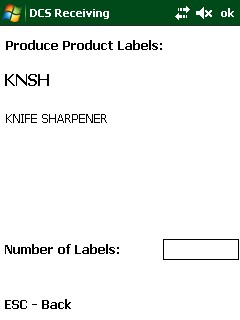
Label Printing
Configuration: Prior to receipting the stock, you must:
The labels will print to the user's selected printer. To change this printer, use transaction 993 (Change Printer) on your barcode scanner. |
|
|
Cancelling Receipted ItemsWhile scanning, it is possible that items may be scanned in error, or a quantity is entered incorrectly. If the operator detects this, receipt lines may be removed. There are two processes required to complete this task.Step 1. Removing the Receiped Item Changing to the receipt review screen and select the 'Detailed' view option. This will show individual scans on the receipt. To delete a receipt line, highlight the line to delete and press the DEL (delete) button on the scanner's keyboard. The operator is prompted to confirm that the item should be removed. Step 2. Adjust Inventory After the item is removed from the receipt, you will still need to perform an inventory adjustment. If the stock was received to a pallet, the 263 (Pallet Transfer Off) function should be used to move the items to an Adjustment location. If the stock was received into a location, the 243 (Inventory Transfer) function can be used to move the stock from the location into an Adjustment location. |
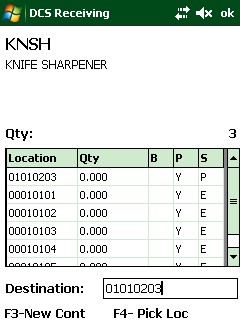 |
Entering the DestinationNavigator requests the destination for the items after the quantity is entered and also displays the current pick location for this item in the warehouse. The destination may be:
The decision between which of the options listed above you use will depend on the requirements of each individual warehouse, for example:
Navigator will give an error message if the item scanned is neither a location or a container. To create a new container label, press F3. This will load the container creation screen to generate and print container labels. Once the container label or location has been scanned, Navigator records the receipt line transaction. Once the receipt has been finalised, inventory in this location/container will be increased. Note that if the ALLOW_REALTIME_RECEIPT flag is set to '1', the inventory will be available straight away. Cross Docking If the Cross Docking function is enabled, Navigator will immediately display a list of pick slips which require the item receipted. For more information on this function, please see here. Configuration: - To prevent entry of the destination location, set the system parameter 'RECEIPT_REQUEST_DESTINATION' to '0'. |
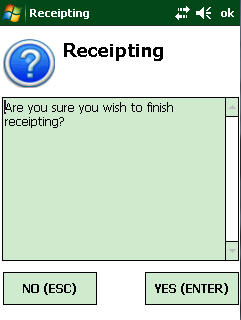 |
Finalising the Receipt
Once you have complete checking off items from the container/truck, press F5 from the Receipt Menu. Navigator runs through all of the receipted items and increase inventory levels in the bin locations (or containers) scanned. Note that until the receipt is finalised, stock is not available for picking and does NOT appear in the inventory master unless the system-wide parameter 'ALLOW_REALTIME_RECEIPT' is set to '1'. |
Put AwayThe putaway process in Navigator is controlled via a separate screen - 224 - Putaway via Container. For more information, please see: here
|
Search for receipts via the Warehouse Operations -> Receipts.
| Storage Client | Filters the receipt by the owner of the stock. |
| Site | The warehouse stock was receipted into. |
| Receipt Type | Searches by the reason code specified by the operator when the receipt was created. |
| Receipted By | The employee who created the receipt document. |
| Receipt ID | Search for a specific receipt number. Navigator will show this receipt at the top of the screen if the 'Return Rows' parameter is more than 1. |
| Reference | Filters receipts by the reference number entered by the user when the document was created. |
| Containing Part Number | Searches for a given part number (in combination with the Storage Client). |
| Containing Serial Number | Shows receipts containing the supplied serial number. |
| Shipping Container | The shipping container reference entered by the operator during receipt creation. |
| Start Date | The date must be formatted as YYYYMMDD - shows receipts created on or after this date. |
| End Date | The date must be formatted as YYYYMMDD - shows receipts created on or before this date. |
| Return Rows | Specifies how many receipts should be displayed - defaults to 100. |
| Receipt ID: | This uniquely identifies the receipt number in the database. |
| Receipted By: | The user who performed the action. |
| Comments: | A free text field for notes on the transaction. |
| Inbound Request: | A link to the source document (e.g purchase order). |
| Export ID: | The transaction reference for the return of this information to an external system. |
| Receipted Into Location: | The location in the warehouse where stock was initially placed. This is typically (but not necessarily) a staging area. |
| Receipted Into Site: | The site at which the goods were received. |
| Storage Client: | The owner of the stock. |
| Receipt Reason: | The receipt reason code selected by the user when performing the receipt. |
| External Reference: | The sender's reference to trace the origin of the inbound goods. This may be manually entered in the case of an "unexpected" receipt. |
| Shipping Container: | The shipping container number the goods were received in, if applicable. |
| Finalised On: | The date on which the receipt was completed and inventory transactions created. |
| Inventory Transactions: | A link to the bin level inventory transactions created by this transaction. |
Part Number: |
Part number of the item receipted. |
Part Description: |
Description of the item receipted. |
Serial Number: |
The serial number of the product received. This field will contain data only if the product is marked as being tracked by serial number in the WMS. |
Qty Received: |
The number of units received of the given item. |
Location: |
The location into which inventory was received.. |
Container: |
The pallet into which inventory was received. |